Photography is something that always look simple enough from the outside, yet to be a competent photographer is something that takes a confident understanding of photographic terms and practices.
The first step to becoming a better photographer is understanding the primary functions of a still camera. Firstly for switching on a still camera most will be very easy to turn on. Simply press any one of the buttons on the back of the camera and this should you to the main menu of the camera.
From here the first things to help you take a great photograph are setting the shutter speed and aperture correctly. The shutter speed is the amount of time that the shutter is left open when taking a photograph. The second key aspect to a good photo is the aperture setting, which coincides with the shutter speed to create your desired photo. I will fully explain how to use both later on in this post.
Some other important features on a still camera are the Auto/Manual focus button. This is important as for beginners it is probably easiest to keep the camera set on auto focus, which means the camera will automatically set the focus to suit the light conditions. Once you get more confident with a camera you will be able to manually focus the camera to perfectly suit the conditions. Below is a full image showing you what most digital still camera layout’s are like.

Within the still camera category there are three types, point and shoot, DSLR and 35mm film. All of these have differing uses with firstly the point and shoot being the most simplistic of the three types. It’s primary use is to be easy to use for example for holiday photos. The point and shoot cameras are perfect for people starting out with photography as they have very basic functions yet can still produce a crisp, high quality photo.
The next standard of camera is the DSLR style cameras, which were initially only available to professionals, however recent developments have now meant they have reached the consumer market. These cameras are ideally suited for amateur photographers as the multitude of functions they have can result in a highly professional looking photo if used correctly. The aperture, focus,ISO and shutter speed settings can be adjusted to match certain light conditions for example. These camera settings can help the photographer produce a certain effect if they desire such as a blurred effect or a certain lighting angle.
Finally 35mm are the rarest of the three camera types, mostly because these are older style cameras which have generally been surpassed by modern technology. On the other hand, the 35mm camera were the leading technology at the time, and is still sometimes used as some photographers prefer the shots taken from an older style, less technological camera. Another plus point for 35mm camera are the fact the photographer can manually set the film speed, which can be changed to affect the style and quality of the shot. Generally, whilst 35mm camera have been left behind by modern DSLR and point and shoot cameras, although a keen amateur or professional photographer with good knowledge of 35mm cameras could still produce a high quality photo.
Much like the differing type of cameras, there are several different types of lenses which can be used for differing effects. There are two main types of lenses however, with the first main type being zoom camera lenses. These type of lenses can be adjusted to focus in or out on a particular subject, which makes it a lot easier to take a high quality photo on your chosen subject. Typically zoom lenses are used mostly in small format cameras, and this is simply because of their size and price limit that restricts their use beyond smaller cameras.
The second main type of lens is the “close up” or macro lens. This type of lens is typically used to photograph small subjects in a close up form. The biggest limiting factor however with macro lenses is the fact the depth of field is very narrow, something which is to counter-act means the lens is stopped down to give a greater depth of field. Despite this the macro lens is still a less favorable style of lens to use because of the lower quality of the depth of field in comparison to zoom camera lenses. Both zoom and macro lenses are the most common type of camera lens, there are plenty of other lesser known types which each serve for specific functions, although these types are rarely used for any other purpose.
The time that the shutter is left open is reflected in the shutter speed numbers on the screen. Shutter speed is easy to identify as it is presented as a fraction e.g. 1/125. The higher the numbers such as 1/125 will mean a much crisper and clearer shot compared to a lower shutter speed, such as 1/25, which will produce a more blurry shot.
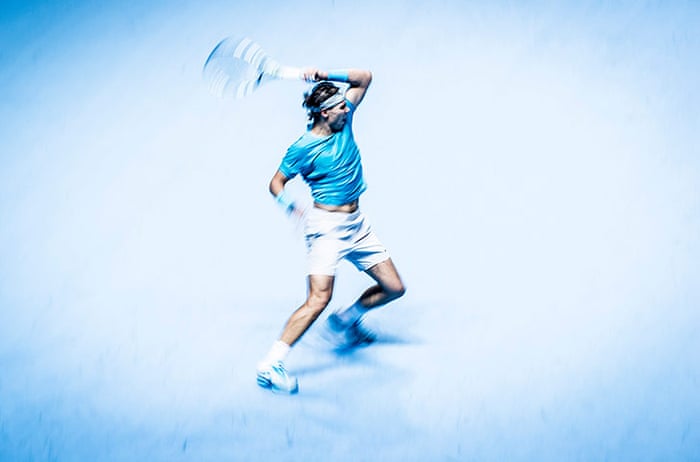
This illustrates how the shutter speed can affect the photo, with this shot taking using a very low shutter speed of 1/30, which has produced this very blurry shot of Rafael Nadal.
The aperture is typically known as the F-stop, with the aperture setting being presented as F followed by a number e.g. F8. The aperture is the amount of light in by the lens therefore in poor light conditions the aperture will be at a high setting e.g. F16, whereas in very bright light conditions the aperture will be set very low e.g. F1.6.
The final aspect to learn as a key function of modern cameras is the film speed, which is the cameras sensitivity to light and is displayed as the ISO setting. This is particularly important when taking photos outside as the wrong ISO settings will mean the photos you take will be of a low quality because of the outside light. Therefore on modern DSLR cameras the ISO settings can be adjusted to suit the light conditions and the overall quality of the photo, with a higher number meaning a higher quality image but in a situation with a lot of light and would not be very good in outside sunny conditions or in rooms with high quality lighting. On the other hand, a very low number will produce a lower quality photo in terms of pixels but will be very good in high light conditions.
Light sources can be used to create a lighting effect within the particular shot, with an example being a slow shutter speed being used to create a blurry effect with the lights. Also studio lighting can be used to suit the subject of the photo, a practice which is commonly used in interviews or photo shoots. Also in outside lighting conditions the natural light can be used to create a desired effect with your photos.
One of the key first steps in learning about taking high quality images is learning the rule of three in photography. This is where you will learn to look at the image viewfinder in a grid format. This therefore means when looking to take a photo your subject is lined up perfectly through the viewfinder in a rule of three symmetry. This is the desired photo effect as it will produce a high quality image. Once you’ve learnt it the viewfinder will become a grid split into 9 squares, of which the desired effect is to have your subject of the photo perfectly framed within the central squares of the viewfinder.Another image composition effect is the golden triangle, which is typically used in photos with diagonal lines. This is composed of the photo being split into three main triangles of equal length which then make up the photo.
When it comes to editing photography, there are plenty of software and websites which can help photographers edit their photos. Some of the most popular editing software is Adobe photoshop and illustrator, both of which are widely used within the industry by professionals and budding amateur photographers alike.
One of the most common photo editing forms is cropping, where you will reduce the outside edges of the photo, and the effect of this is to improve the overall framing of the photo and can vastly improve the quality of the image to focus on a certain subject within the photo. Other popular photo editing techniques are dodging and burning, which decreases and increases the exposure of the photo to make it lighter and darker respectively. This technique is typically used when the photographer is forced to shoot in poor lighting conditions e.g sunlight or darkness, and whilst it cannot rectify extreme examples of either bright or poor lighting, it can help in some cases to improve the quality of the photo.
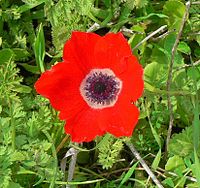
Here is an example of a cropped photo, where the photographer has cropped the outer edges of the photo to focus on the main subject, which is the flower.
The final major photo editing technique is adjusting curves, however this effect is difficult to master and is generally only used by competent amateur and professional photographers. Adjusting the curves is a term for adjusting the tones of a photo. This can have a big effect on the photo, as it can brighten or darken the photo, add contrast and help shift the colours used. Whilst using adjusting curves as an editing tool can seriously alter your photographs, it’s complicated technique means that a degree of competence with the system is needed before being able to use it effectively on your photos.

Nice One Jord!
Haha thanks Adam it’s just something I had to do for college so spend a lot of time on google researching these different things for this first draft I’ll probably have to make a load of changes soon
http://youtu.be/F8T94sdiNjc for more details on Aperture, Shutter Speed, ISO. i actually didn’t know what ISO was and had to look it up then found the video with more info.